
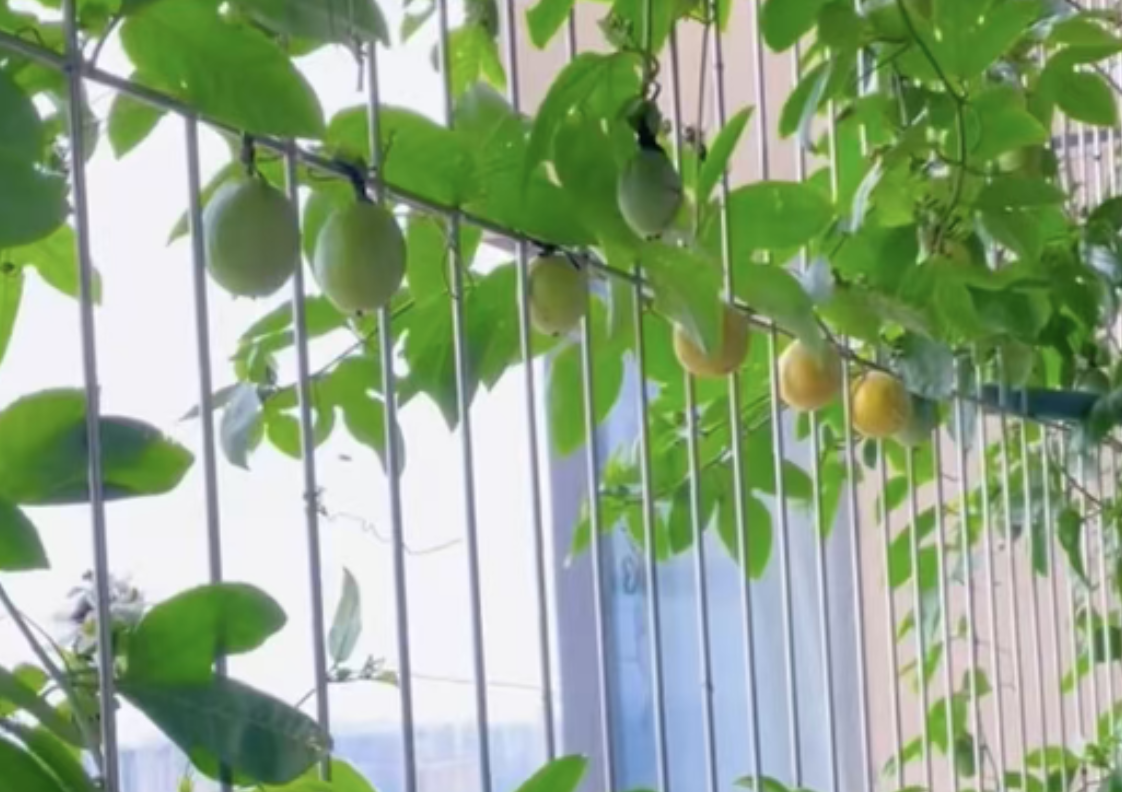
A plant enthusiast managed to grow passion fruit right on their apartment balcony — from a bare little seedling all the way to a vine heavy with fruit — and generously shared the entire process! After reading the post, many people were amazed and asked, “Can you really grow passion fruit on a balcony?” The truth is, if you follow the steps, even beginners can do it. Who knows — your own balcony might soon be overflowing with fresh passion fruit!

Step 1: Choosing the right seedling and pot
This grower said the most important part is selecting healthy seedlings and a proper container. At first, they made the mistake of buying cheap roadside seedlings — thin, weak little plants that failed to grow and died after two months. The second time, they bought more mature cuttings (at least six months old) with thick stems and visible roots — and the survival rate shot up immediately.
As for the pot, they used a 35 cm wide and 40 cm deep clay pot with five drainage holes drilled in the bottom, since passion fruit roots grow fast and hate waterlogging. They had seen other people use old pots with no drainage holes — the seedlings rotted right after sprouting new leaves, wasting all their effort.
Step 2: Preparing the soil
The grower’s “secret mix” was simple and budget-friendly: leaf mold, garden soil, and river sand in a 3:2:1 ratio, with a handful of well-rotted sheep manure as base fertilizer. They recommended tweaking the mix based on your climate — add more sand in humid southern regions to keep soil loose, and add some coco coir in dry, windy northern areas to help retain moisture.
Before using the soil, they spread it out in the sun for a couple of days to kill pests and pathogens — skipping this step, they said, often leads to bug problems later.
Step 3: Setting up a trellis
Passion fruit is a climbing vine, so once the plant reached about 30 cm tall, they trained it to climb the balcony security bars — simple, space-saving, and it even provided some summer shade. They warned not to wait too long, or the vines will tangle and become a nightmare to untangle later.
Step 4: Watering and fertilizing
Water only when the top layer of soil is dry, and water thoroughly — don’t just half-water. In summer, when balcony temperatures soar, they watered every 2–3 days and misted the leaves to cool them down. In winter, they watered about once a week, using water that wasn’t too cold to avoid shocking the roots.
Fertilizer was applied in stages:
During the seedling phase, they watered with diluted urea to promote vine and leaf growth.
After flower buds appeared, they switched to potassium dihydrogen phosphate (1:1000 dilution), spraying the leaves or watering once a week. They said this doubled the number of flower buds and greatly improved fruit set.
Step 5: Pruning and pollination
These two steps are crucial for a good harvest. When the vine reached about 1 m tall, they pruned the top to encourage side shoots — since side branches are the ones that bear fruit. They also regularly removed old and diseased leaves near the base to improve air circulation and reduce disease risk.
Pollination was easy: since their balcony was enclosed, they hand-pollinated by dabbing pollen from the male part of the flower onto the female part with a cotton swab. If your balcony has open windows and bees can get in, you might not even need to do this. The first year they didn’t pollinate, they only got two fruits. After learning to hand-pollinate, they harvested over twenty in one season!
By following this method, they planted the seedlings in spring and harvested the first passion fruit that autumn — fragrant, sweet-tart, and juicier than anything from the supermarket.
Growing passion fruit on a balcony isn’t nearly as hard as it sounds. Choose the right seedling and pot, prepare good soil, set up a trellis, water and fertilize carefully, and be patient for a few months — and you just might find your balcony covered in passion fruit vines next season!

Leave a Reply